
How to set up test management in Jira for free?
Test management is an inevitable part of a software development life cycle. It isn’t a big surprise that the customers of the powerful project management, task, and bug tracking tool – Jira, often look for solutions that can expand its capabilities with additional quality assurance features. While the Atlassian Marketplace offers many test management tools that suit even the most complex testing requirements, most of them are very expensive and therefore out of reach for some customers. So, what’s left then? You can rely on a good old spreadsheet to write and manage your tests, or you can check out QAlity – Test Management for Jira – a free expansion for Jira that introduces test management capabilities and is already used by over 1000 customers worldwide!
This article will guide you step-by-step through the installation and initial configuration of QAlity – Test Management for Jira. By the end of this guide, you will be all set to manage your tests in Jira for free.
Installation
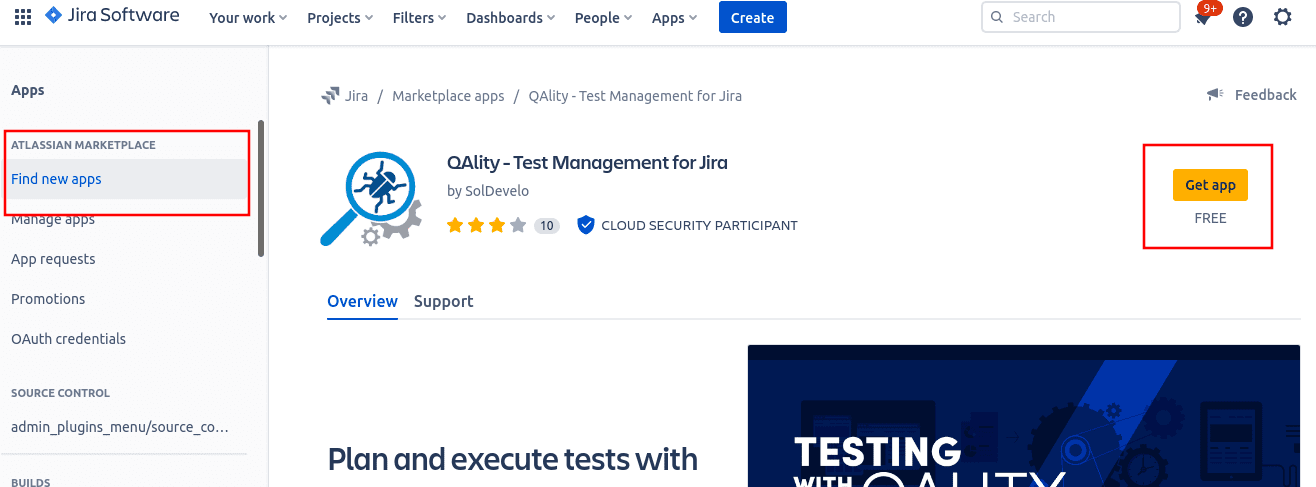
Before you begin, you need to install the app on your Jira instance. This action is easy, but can only be performed by your Jira administrator. Marketplace apps can be added directly via your Jira instance. Go to Settings and then Apps management in your Jira and then search for “QAlity” in Find new apps. You should easily find QAlity – Test Management for Jira in the search results, together with a confirmation that the app is free.
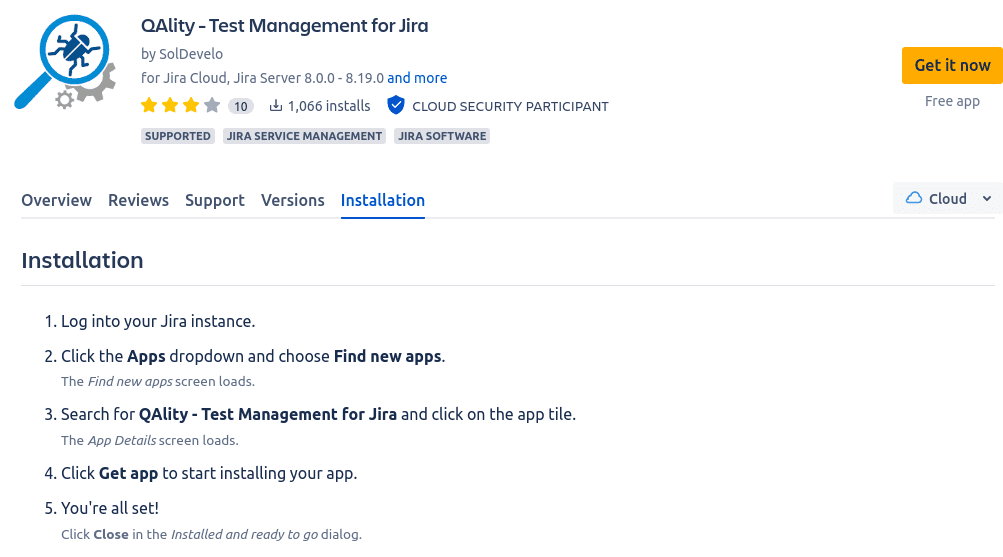
Alternatively, you can also install it through the Atlassian Marketplace. To do so, visit our marketplace page, select your hosting type (cloud or server) and then click on Get it now and follow the instructions.
Enable QAlity Test issue type
In order to start using QAlity in any of your projects, you need to enable the QAlity Test issue type for them. Depending on whether it is a company-managed project or a team-managed project, this configuration is different.
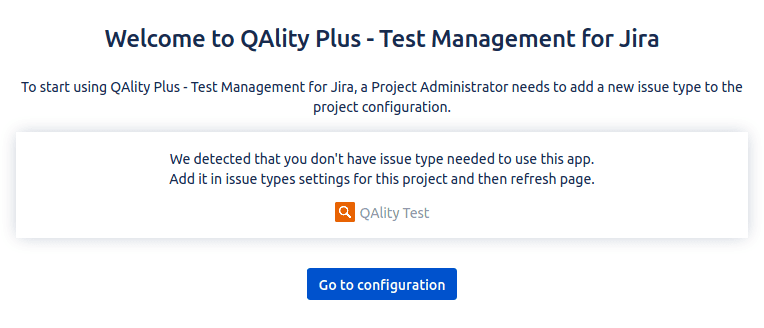
You will be informed about the need to enable the “QAlity Test” issue type when you view any issue in your project. The following information shows up when you did not enable the required issue type yet. Jira administrators can click on the “Go to configuration” to set up the QAlity Test issue type for the project.
Company-managed project
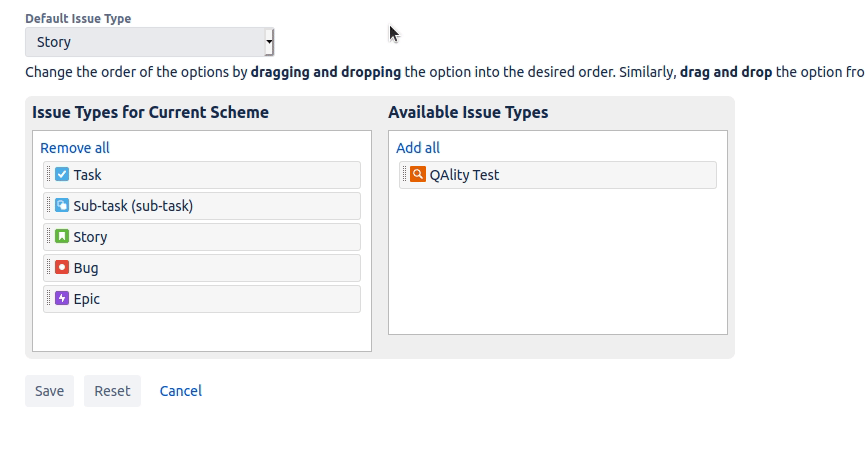
The configuration in company-managed projects should display currently enabled issue types as shown below. In order to modify them, click on Actions and Edit issue types.
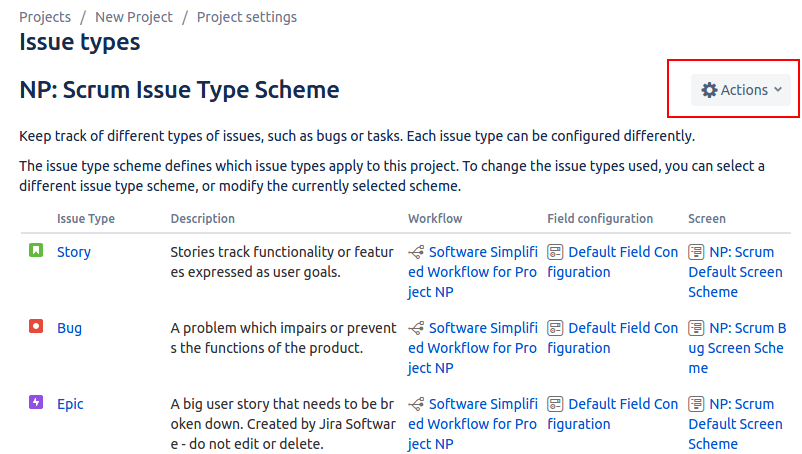
This will bring you to the screen that displays issue types in two columns. One column showing the issue types that are currently enabled. And another column displaying issue types that are available, but not enabled. Move the “Test case” issue type from one column to another, in order to enable it and then confirm it by clicking on Save. That’s it! The QAlity Test issue type is now enabled.
Team-managed projects
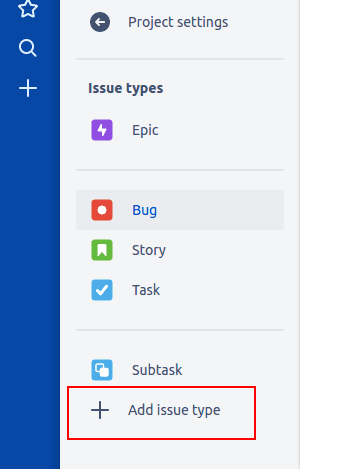
Team-managed projects use simplified configuration and therefore setting up the issue types works in a different way. Similar to company-managed projects, you will be informed about the need to enable the issue type as soon as you enter any of your Jira issues. Users who can manage this project can click on “Go to configuration” to set up issue types.
Available issue types will be shown in the menu on the left-hand side. In order to add a new issue type, you need to click on the “Add issue type” button.
This will display a dialog that allows you to provide the details for the new issue type. Please note that the new issue type must be named “QAlity Test” in order to be recognized.
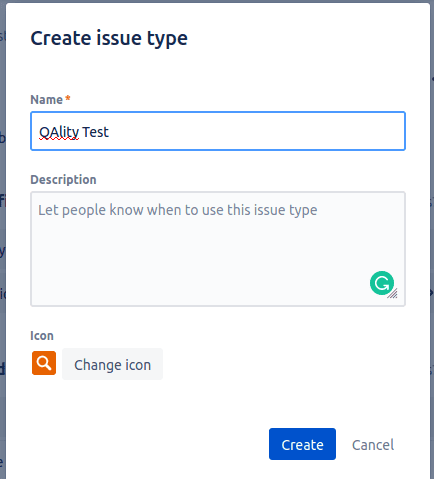
Confirm the addition by clicking “Create” and the configuration is done! You can also use the following icon in order to easily distinguish this issue type from others.
![]()
Create your first test case
Once QAlity Test issue type is enabled you will be able to easily create a test case. You should see an option to create a test in any of your Jira projects that have the issue type enabled. Click on the +Test Case and start filling in the details for your test case.
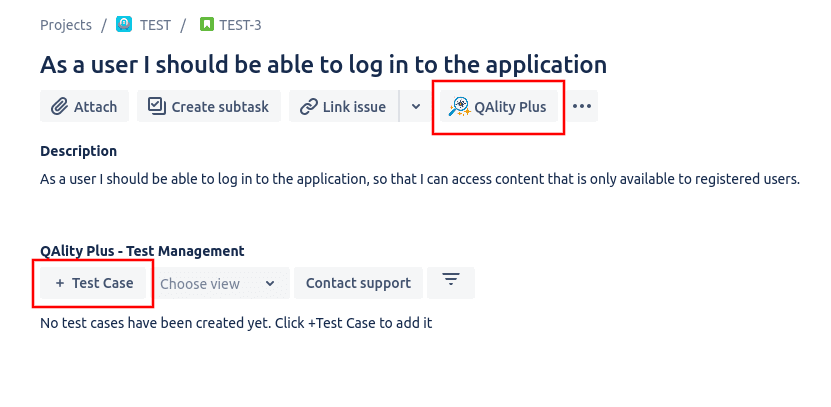
Alternatively, you can also simply create a new Jira issue and select the issue type “QAlity Test” to create a test case. You can view a list of all test cases by opening QAlity menu and selecting Overview from the Test case section. Since test cases are represented by Jira issues, you can also search for Jira issues of the QAlity Test issue type.
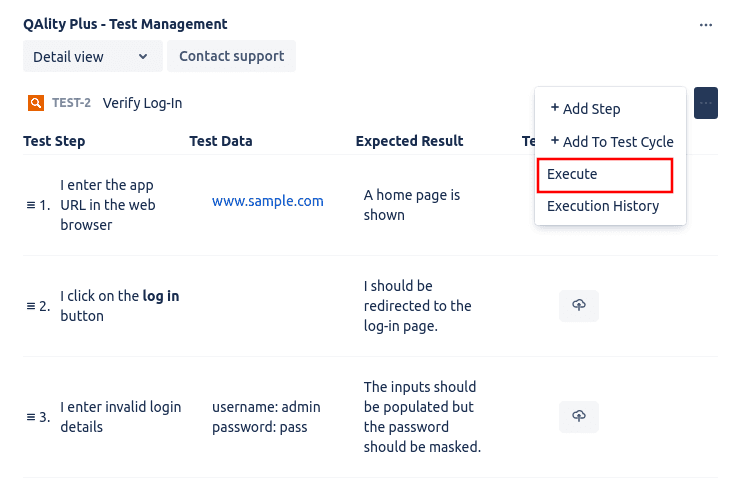
Execute tests
When your test case is ready, you can execute it by opening a menu in the top-right corner and selecting Execute.
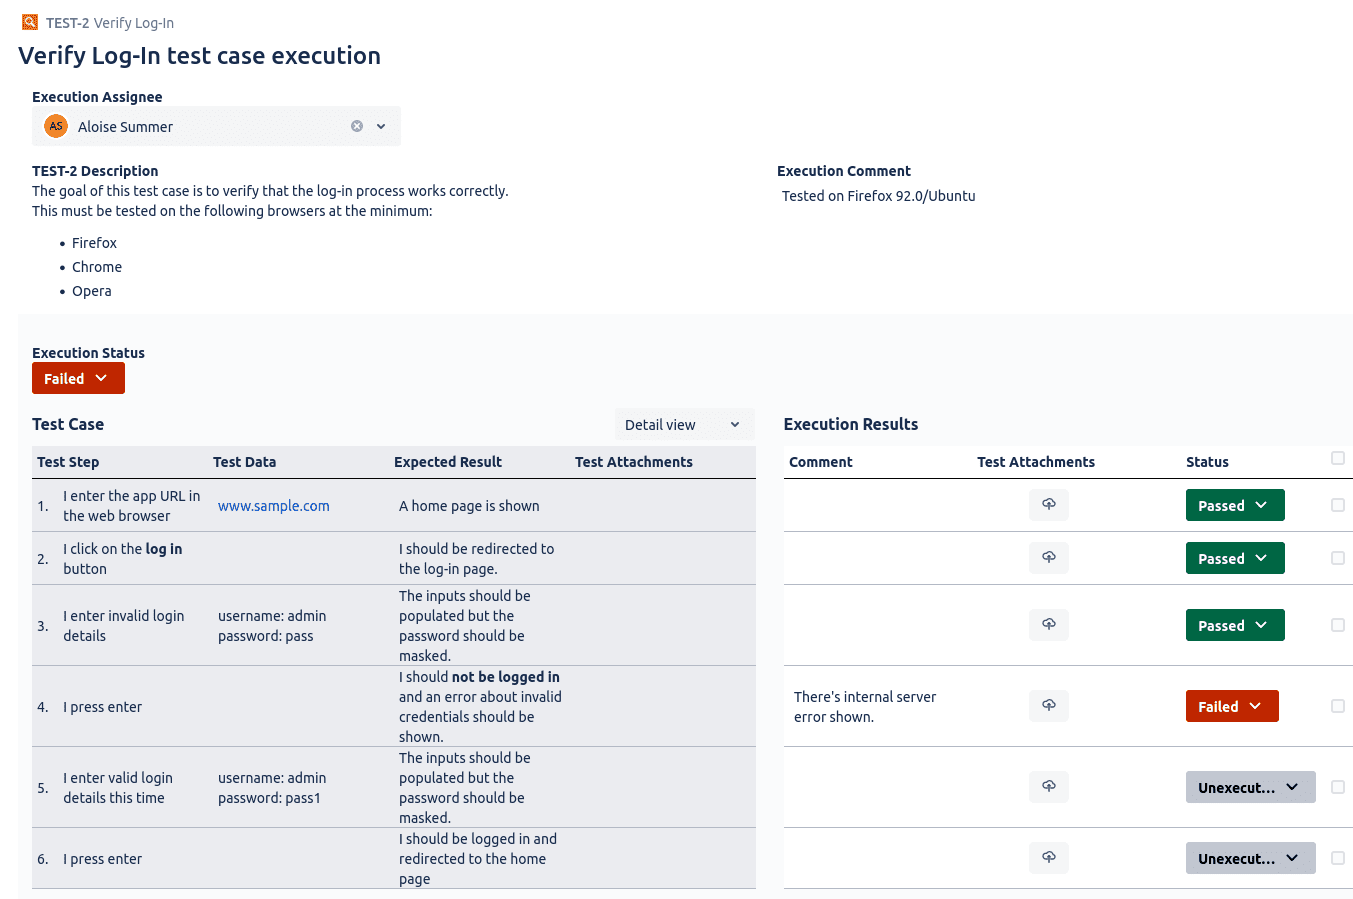
This will open the test execution screen where you can record test run results. Each test case can be run as many times as you need. You can see the results of each run in the execution history, as well as on the Test Execution report page.
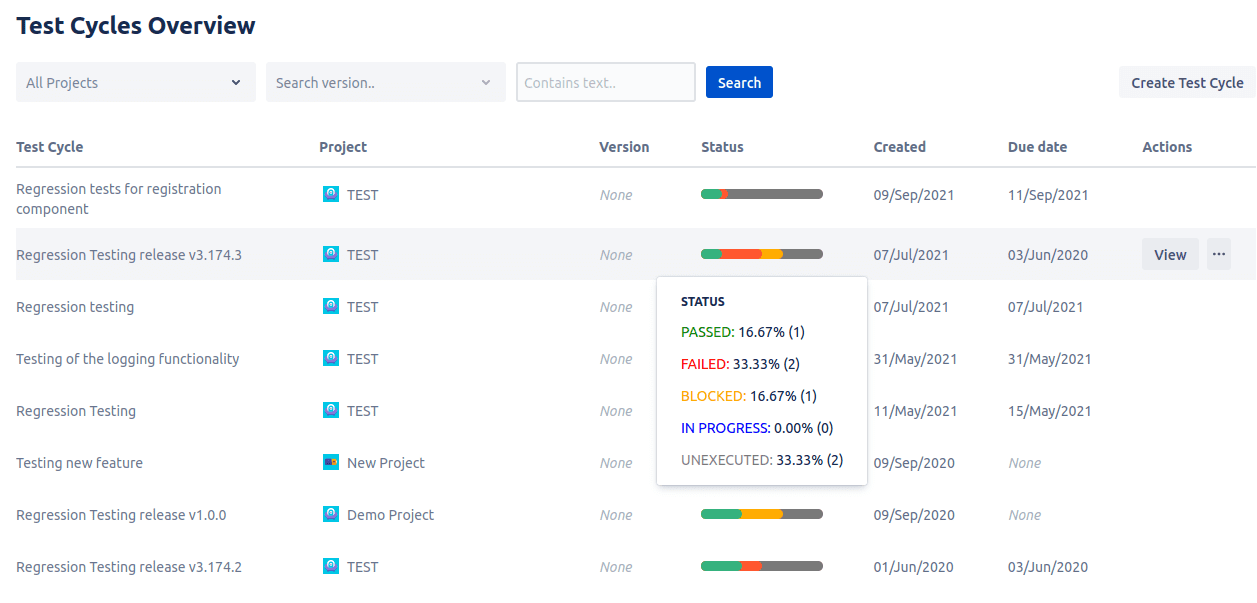
Test cases can also be arranged into test cycles. This allows you to prepare a test plan, easily view the progress of the testing in the given cycle, as well as repeat the whole testing cycle again.
Summary
QAlity – Test Management for Jira will allow you to introduce test management in Jira for free. You can use all of its features and capabilities free of charge as long as you wish. QAlity includes test case and test cycle management, running tests, and simple reporting. If you ever need more advanced features, you can upgrade to QAlity Plus – Test Management for Jira, which is suited for enterprise needs and includes premium customer support. Upgrading to and back from QAlity Plus is simple and explained in our documentation. You can also check the feature comparison between QAlity and QAlity Plus.