Docker has revolutionized the way developers build, share, and run applications, offering an unparalleled level of efficiency and flexibility through containerization. Despite its inherent advantages over traditional deployment methods, Docker environments are not immune to security threats. With its widespread adoption, the imperative to fortify Docker’s security framework becomes crucial.
This article focuses on the essential aspects of Docker security. Highlighting best practices and auditing strategies, we aim to equip you with the knowledge to enhance the security of your Dockerized applications, ensuring they remain robust against the dynamic spectrum of digital threats.
Identifying potential security threats
Before delving into security measures, it’s crucial for each application to undergo threat modeling to identify specific vulnerabilities. However, for the scope of this article, we will concentrate on the foundational elements that universally require hardening: Host, Docker Daemon, Containers, Networks, and Registries.
By addressing these critical components, we lay the groundwork for a comprehensive security posture that can mitigate a wide range of potential threats, paving the way for a more secure Docker environment.
Is Docker safe?
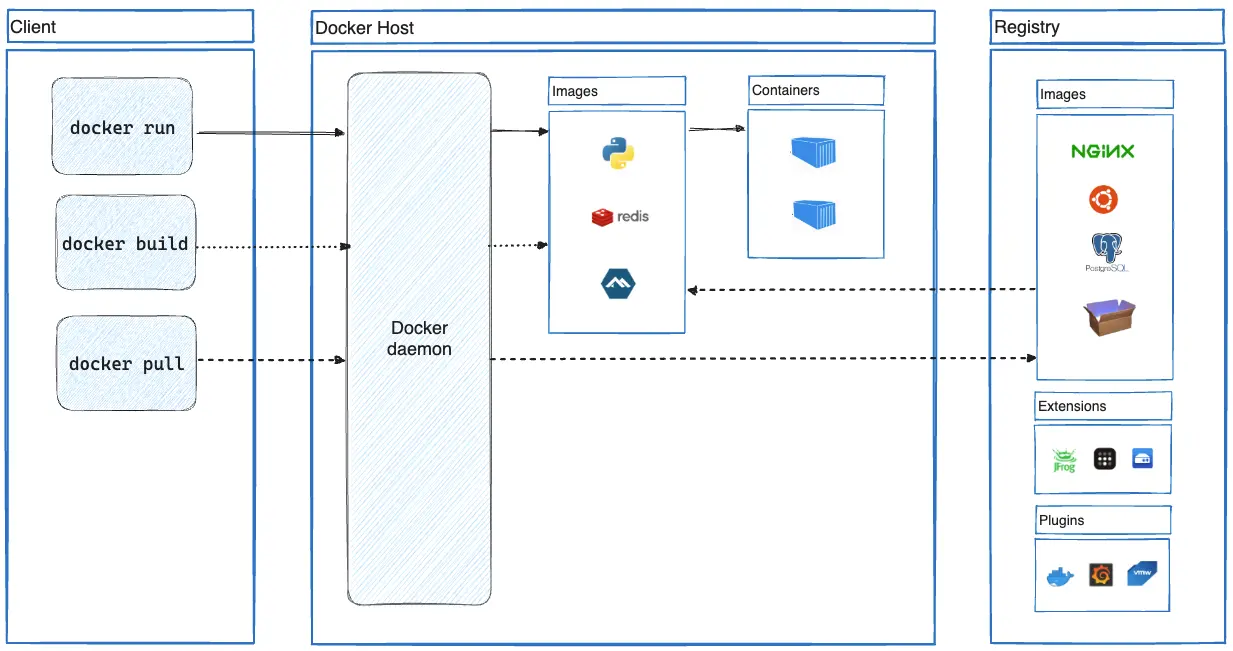
Docker’s architecture is designed with security in mind, leveraging isolation mechanisms such as namespaces and control groups (cgroups) to restrict and manage the capabilities of containers, effectively minimizing the attack surface. However, the dynamic and evolving landscape of cybersecurity threats necessitates regular updates and patches to address newly discovered vulnerabilities. Staying updated ensures that security enhancements and fixes for known vulnerabilities are applied, reducing the risk of exploitation.
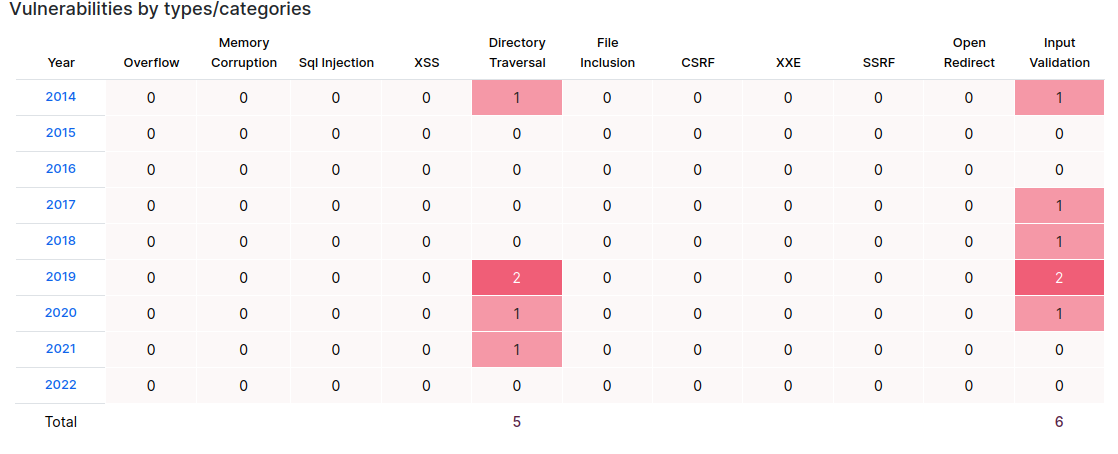
Regularly updating Docker and container images is a critical practice for maintaining a secure environment, as even the most secure systems can become vulnerable over time without diligent management and updates. Thus, for a detailed understanding of the importance of each update, see the table of known vulnerabilities for each Docker version:
Secure Host
It is important to consider that your containers are only as safe as your operating system is. It is recommended that developers use the operating system they are comfortable with. For example, Linux distributions are all slightly different in handling packages and other changes. If the host operating system is compromised, then your containers can be also overtaken by an attacker. That is why the system also must be audited and secured.
Host OS should be as minimal as possible. It limits the threat attack surface and minimizes the vector of an attack. So it is crucial to check if they are not hosting any unnecessary services like web server, web application, or anything else that might be or lead to any potential exploitation. For production and deployment to minimize footprint: resource consumption and attack threats, we can use a pared-down version of OS.
Examples:

Alpine Linux

RancherOS

Fedora CoreOS

Ubuntu Core
The Linux Audit Framework
It is a framework that allows to set up various policies for any user or services action. Auditing lets us log and analyze any activities from the system or service. It is important because in the event of breach we must be able to check what was the issue. This system of accountability logs every action performed, file deleted, file copied, etc.
The way it works for Linux, all auditing is handled in the Kernel. An application, like Docker, generates logs. It makes system calls to the Kernel, where the logs are analyzed. If a log matches any audit policy, it is sent through audit daemon to audit logs where it is stored. To read the stored logs we can use Aureport, Ausearch, or Aulast.
Auditing tools
Docker-bench-security
Docker-bench-security is an audit tool designed to assess and improve the security posture of Docker environments, available for cloning from its GitHub repository.
In certain instances, it is imperative to execute the command with elevated privileges using sudo. It is essential to denote that the operation is conducted in a testing capacity on the Host. To facilitate this, execute the following command from the root directory of docker-bench-security:
sudo ./docker-bench-security -c host_configurationIt will exclusively perform checks on the Host system. For each action under the directive “ensure auditing is…”, it is advisable to create audit rules. These rules are crucial for the integrity and security of Docker environments, and must be meticulously monitored and audited.
The Linux Auditing Framework
It is a comprehensive utility designed for monitoring and recording system activities on Linux, providing an essential layer of security through detailed auditing. To install auditd, execute the command:
sudo apt-get install auditd -yOnce installed, ensure its automatic activation upon system startup with:
systemctl enable auditdTo verify its operational status:
systemctl status auditdcan be used, indicating successful installation if the service is active.
Moreover, auditd allows for a granular inspection of system events. Utilize:
sudo aureportto generate a summary report, offering insights into logins, terminal sessions, and other system activities. Establishing audit rules is straightforward; for instance, monitoring specific activities related to Docker can be achieved with:
sudo auditctl -w /usr/bin/dockerd -k dockerwhere -k assigns a keyword for filtering purposes. Existing audit rules can be listed using:
sudo auditctl -lfacilitating easy management and review of monitoring criteria.
This process of creating and managing audit rules should be applied iteratively to all binaries, configuration files, and directories as recommended by docker-bench-security, ensuring a thorough and effective audit strategy for Docker environments.
Furthermore, it is imperative to persistently save the audit rules to prevent their loss upon the restart of the auditd service. This can be accomplished by navigating to the audit rules configuration file:
sudo vim /etc/audit/rules.d/audit.rulesWithin this file, one should paste the output derived from the command:
sudo auditctl -lFor example, entries might include rules such as:
-w /usr/bin/dockerd -p rwxa -k docker
...
This procedure ensures that all specified audit rules remain effective and are automatically reapplied following any restart of the auditd service, thereby maintaining continuous security monitoring without interruption.
InSpec
It is a tool that enables the scanning of running Docker containers to ensure they are based on the correct images, utilizing appropriate ports, executing proper commands, and more.
To instal InSpec on Ubuntu:
curl https://omnitruck.chef.io/install.sh | sudo bash -s -- -P inspecThen, download Benchmark that will be used:
git clone https://github.com/dev-sec/cis-docker-benchmark.gitThen, we can audit the platform:
inspec exec cis-docker-benchmark/
Accept license, and report will generate:
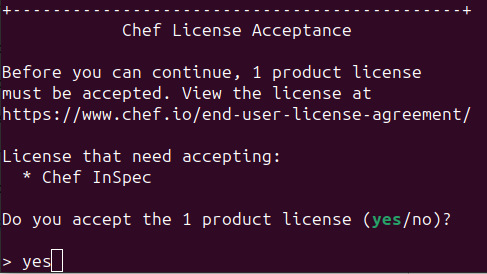
Unfortunately this is not a free tool anymore but it has a free trial and a free version. This automated tool is better than docker-bench-security because it provides a detailed plan on how to mitigate listed issues.
Lynis
Lynis is an auditing security tool tailored for systems based on Unix-like operating systems such as Linux and macOS. It conducts an in-depth security scan directly on the system itself. The primary objective is to evaluate the security measures in place and provide recommendations for enhancing the system’s security posture.
Installing Lynis
Execute the following command to install Lynis from the default Ubuntu repository:
sudo apt-get install lynisHowever, it is recommended to visit the Lynis website and download the latest version directly from there to ensure the most up-to-date security checks are available.
Conducting the first test on the operating system
To initiate a security audit of the system, use:
lynis audit systemThe outcome will include both Warnings and Suggestions. It is the user’s task to assess the relevance of these findings and determine their significance. Implementing selected recommendations can significantly enhance the security hardening of your Host.
The aim is to achieve a hardening index of above 70, indicating a robust level of security hardening has been implemented.
Best practices
Avoid using the root user as default: Operating under the root user by default poses a significant security risk. Instead, create and utilize a less privileged user account for daily operations.
Prefer SSH for server access: To mitigate the risk of brute force attacks, opt for SSH connections instead of password logins. Enhance security further by disabling root access via SSH and prohibiting password-based logins.
For Ubuntu, the process to disable the root user and enhance security includes:
Disabling root user and creating a new user:
Create a new user with a home directory and bash shell access:
useradd -m user1 -s /bin/bashSet a password for the new user:
passwd user1Also, change the default password for the root user:
passwdAssigning groups:
Add the new user, “user1,” to the sudo and Docker groups to grant necessary permissions without defaulting to the root user:
usermod -aG sudo user1
usermod -aG docker user1
Configuring SSH for enhanced security:
Edit the SSH configuration file for more secure settings:
sudo vim /etc/ssh/sshd_configModify the following settings within the file to improve security:
LogLevel VERBOSE # capture detailed log information.
PermitRootLogin no # disable root login via SSH.
MaxAuthTries 2 #limit authentication attempts
MaxSessions 10 # to limit active sessions.
PubkeyAuthentication yes # to enable public key authentication.
PasswordAuthentication no # to disable password authentication, further securing the server against unauthorized access.
Adhering to these best practices significantly bolsters the security of Ubuntu servers by minimizing potential vulnerabilities and reducing the attack surface for potential intruders.
Secure Docker daemon
Manage access to Docker daemon
We adhere to the principle of granting the minimal amount of privileges necessary for a user to perform their specified tasks. This is managed in Docker through the use of user groups, a prime example being the ‘docker’ group, which is established during the initial installation. Members of the ‘docker’ group are granted the privilege to interact directly with the Docker daemon or through the Docker client.
It’s noteworthy that non-administrative users who are not part of the ‘docker’ group will be unable to interact with Docker. Conversely, every member of the ‘docker’ group will have the ability to engage with Docker. This is a critical consideration when transitioning an application from the development phase to the production environment, where developers and engineers granted access will retain the ability to interact with Docker. Thus, even though they may lack administrative privileges, they will still possess the capability to influence and modify the Docker daemon.
To verify the group along with its members, utilize the following command ‘members <group>’:
To enumerate the groups to which a user belongs, execute ‘groups <username>’:

TLS encryption
The following section is relevant only if the Docker daemon is remote. It means that the client is performing operations on other platforms and not directly on the server. For example, it could be client Docker interface or CI/CD pipelines.
We can automate the process of securing our Docker daemon by writing automated scripts or using the existing one like: Docker-TLS-Authentication/secure-docker-daemon
This particular script generates TLS keys, which will become certificate authority for creating a secure TLS environment for Docker. It provides the necessary certificates and keys for both the server and clients, ensuring encrypted communications. This script automates the process of creating a Certificate Authority (CA), server certificates, and client certificates, implementing strong encryption and authentication to secure connections. It meticulously manages file permissions to enhance security, making sensitive keys accessible only to root and ensuring certificates are globally readable but immutable, to prevent accidental alterations.
In order to make Docker daemon to utilize TLS verification or TLS encryption we need to create custom configuration by overriding default configuration:
sudo mkdir /etc/systemd/system/docker.service.dExample of the configuration:
[SERVICE]
ExecStart=
ExecStart=/usr/bin/dockerd -D -H unix:///var/run/docker.sock --tlsverify -tlscert=/home/your_username/.docker/server-cert.pem --tlscert=/home/your_username/ca.pem --tls=/home/your_username/.docker/server-key.pem -H tcp://0.0.0.0:2376
This configuration secures Docker daemon communications by creating a custom systemd service file for Docker and modifying the daemon’s startup options to include TLS verification and specify paths for the server certificate, CA certificate, and server key. Additionally, it configures the Docker daemon to listen for connections on a secure TCP port. This setup ensures that all communications with the Docker daemon are encrypted and authenticated, enhancing security for remote operations.
In order to apply changes, restart of the daemon service is required.
sudo systemctl daemon-reload
sudo systemctl restart docker
Next, check status to see if everything worked as intended:
sudo systemctl restart dockerList ports that Docker is listening on:
netstat -antpIf the configuration is successful, the output will look like this:
Client configuration
In order to configure the client side for secure communication with the Docker daemon, it is necessary to transfer three critical files – key.pem, cert.pem, and ca.pem – to the client’s system. These files should be securely stored within the .docker directory located in the user’s home directory. Furthermore, to facilitate encrypted communication, the following environment variables must be defined on the client side:
To enable TLS verification, set:
export DOCKER_TLS_VERIFY="1"To specify the Docker daemon’s IP address and designate the port for TLS communication, use:
export DOCKER_HOST="tcp://IP:2376"Replace IP with the actual IP address of the Docker daemon.
To indicate the directory where the aforementioned TLS files are stored, set:
export DOCKER_CERT_PATH="/home/client/.docker"This configuration ensures that all communications between the client and the Docker daemon are conducted over a secure channel, leveraging TLS for encryption and authentication.
Implementing user namespaces
In the scenario of a container breakout, an attacker might exploit root processes to escape the container’s confines, thereby gaining certain privileges. It is of paramount importance to distinguish between the user within the container and the process under which the container operates, as well as the owner of the container. To mitigate such risks, it is advisable to reconfigure the Docker daemon to utilize namespaces. Furthermore, administrators have the option to specify a custom non-privileged user or employ the default “dockermap” user that Docker generates, enhancing the security measures against unauthorized access and potential exploits.
The concept of namespaces plays a critical role in achieving isolation by providing each container with its own process tree and process ID. This isolation can be visually confirmed through the top command by specifying the name of our container, as demonstrated:

The image illustrates that while the container operates under the root user, it is assigned to a distinct process ID within its isolated namespace. This distinction is crucial; in the event of a container breakout, the attacker would obtain root privileges within the container’s namespace, highlighting the significance of stringent security measures and permissions management.In order to change default user it is possible to implement the default user provided by Docker, the one that is not the member of sudo groups:
sudo vim /etc/systemd/system/docker.service.d/override.confAdd a flag:
--userns-remap=”default”After reconfiguring, reload the daemon and restart Docker to apply the changes. Subsequently, verify the creation of the sub-user:
cat /etc/subuidShould give output like:
user1: 100000:65555
dockermap: 165536:65555
With the new configuration in place, every container will operate without privileged access by default. Consequently, in the event of a container breakout, the attacker will not possess administrative privileges.
Disable inter container communication (ICC)
By default, containers can communicate with each other using IP addresses. It is crucial to disable this option and instead utilize networks and bridges to define permissible communications or to isolate each component by default. It is important to note that Inter-Container Communication (ICC) may be necessary for some applications. Therefore, it should be disabled by default only if it is not required, depending on whether the containers need to communicate with each other.
To disable ICC, edit the configuration file by executing:
sudo vim /etc/systemd/system/docker.service.d/override.confAdd a flag:
--icc=”false”Then, reload daemon and restart Docker. After providing all of that changes we can audit the environment again with a use of docker-bench-security. It will point out our improvements in the report.
Secure Docker Containers
Not exposed root user
Running any image without additional configuration will result in creating a container with root user. We apply the same rules for securing containers as we do for securing servers. In order to prevent or minimize damage caused by container discrediting, root users must be disabled. We do apply the rule that we grant the minimal amount of privileges that the user/service needs to fulfill tasks.
To add a new user we have to configure Dockerfile, creating a new user and appending a group to this user. Then inside docker-compose.yml we use this user or when we run the container we specify this user with “-u user1”.
Below is an example of creating two users and setting one of them as the default one:
# Specifies the base image
# Creates a new group named 'openimis' and a new user
# The '-r' options are used to indicate they are system user and group, meant for running applications, not for logging in.

RUN groupadd -r openimis && useradd -r -g openimis openimis


# Create the second user (default)
RUN useradd -m user2

# (OPTIONAL) change the ownership of the '/home/openimis' directory (and all its contents) to the 'openimis' user and group.
RUN chown -R openimis:openimis /home/openimis

# Sets the 'openimis' user as the default user for any RUN, CMD, or ENTRYPOINT instructions that follow.
USER openimis
Then, in ‘docker-compose.yml’ we can specify the user. In our example by default it will be ‘openimis’:
version: '3.7'
services:
  service1:
    build: .
    image: myapp_with_two_users:latest
    # No need to set 'user' for service1; it will use 'user1' as default

  service2:
    build: .
    image: myapp_with_two_users:latest
    user: "user2"
Prevent login as the root user (even with proper credentials) with this command inside Dockerfile:
RUN chsh -s /usr/sbin/nologin rootWith this, you prevent any privilege escalation by disabling the user terminal where they can login as root.
Another point is that you should not run Docker containers in privileges mode:
# do not!
docker run --privileged
Linux Kernel capabilities
It is generally recommended to give the least privileges possible for each user, since privileged users bypass all credentials check. That is why it is crucial not to use it.
What is fantastic about this, is that we can just specify what capabilities can be used in the container. Since 2.2 version, it is possible to specify capabilities inside docker-compose.yml file.
Use:
cap_add:
CAP_NAME_TO_BE_ADDED
Or:
cap_drop:
   - CAP_NAME_TO_BE_DELETED
Also, it is a good practice to first drop all capabilities:
cap_drop:
   - ALL
A list of the Kernel capabilities is available in the manual.
Read only mode
In order to prevent containers from writing any changes to the file system, we can run it as a read-only container. It can still make changes to some temporary files like “/opt” or any other folder we specify, but won’t affect any system files.
In docker-compose.yml file specify read only mode and add volume for files:
services:
  myservice:
    image: myimage
    read_only: true
    volumes:
      - myvolume:/path/to/writable
Limit resource
It is a good practice to limit resources per container. If any of those will be infected, it will be easier to handle those kinds of attacks. Breaking one container with DoS attack won’t affect other containers, if the restriction for resources is set. It is also good for performance.
Disabling Inter-Container Communication (ICC)
When you run containers without specifying a network, they are attached to the default bridge network. This network configuration allows containers to communicate with each other through their IP addresses. To restrict this behavior and disable ICC, you can create a custom bridge network with ICC disabled.
Example:
version: '3.8'
services:
  myservice:
    image: myimage
    networks:
      - my_custom_network

networks:
  my_custom_network:
    driver: bridge
    driver_opts:
      com.docker.network.bridge.enable_icc: "false"
References:
https://www.docker.com/
https://docs.docker.com/guides/walkthroughs/what-is-a-container/
https://hackersploit.org/docker-for-penetration-testing/
https://github.com/docker/docker-bench-security
https://docs.chef.io/inspec/
https://man7.org/linux/man-pages/man7/capabilities.7.html